프로젝트 생성
▶️ 사전 준비물
- Java
1117 설치 - IDE : IntelliJ 또는 Eclipse 설치
" 스프링 부트 스타터 사이트로 이동해서 스프링 프로젝트 생성"

라이브러리 살펴보기
Gradle은 의존관계가 있는 라이브러리를 함께 다운로드 한다.
▶️ 스프링 부트 라이브러리
spring-boot-starter-web
- spring-boot-starter-tomcat : 톰캣(웹서버)
- spring-webmvc : 스프링 웹 MVC
spring-boot-starter-thymeleaf : 타임리프 템플릿 엔진(View)
spring-boot-starter(공통) : 스프링 부트 + 스프링 코어 + 로깅
- spring-boot : spring-core
- spring-boot-starter-logging : logback, slf4j
▶️ 테스트 라이브러리
spring-boot-starter-test
- junit : 테스트 프레임워크
- mockito : 목 라이브러리
- assertj : 테스트 코드를 좀 더 편하게 작성하게 도와주는 라이브러리
- spring-test : 스프링 통합 테스트 지원
View 환경설정
package hello.hellospring.controller;

import org.springframework.stereotype.Controller;
import org.springframework.ui.Model;
import org.springframework.web.bind.annotation.GetMapping;

@Controller
public class HelloController {

    @GetMapping("hello")
    public String hello(Model model){
        model.addAttribute("data", "hello!!");
        return "hello";
    }
}
<!DOCTYPE HTML>
<html xmlns:th="http://www.thymeleaf.org">
<head>
<title>Hello</title>
<meta http-equiv="Content-Type" content="text/html; charset=UTF-8" />
</head>
<body>
<p th:text="'안녕하세요. ' +${data}" >안녕하세요. 손님</p>
</body>
</html>
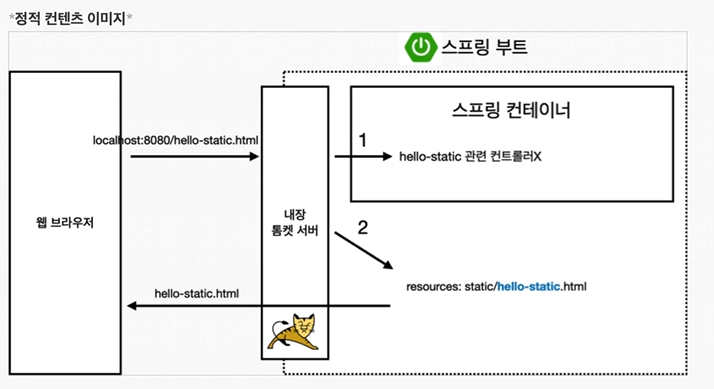
컨트롤러에서 리턴 값으로 문자를 반환하면 뷰 리졸버 (viewResolver)가 화면을 찾아서 처리한다.
- 스프링 부트 템플릿엔진 기본 viewName 매핑
- 'resources:templates/' + (ViewName) + '.html'

API
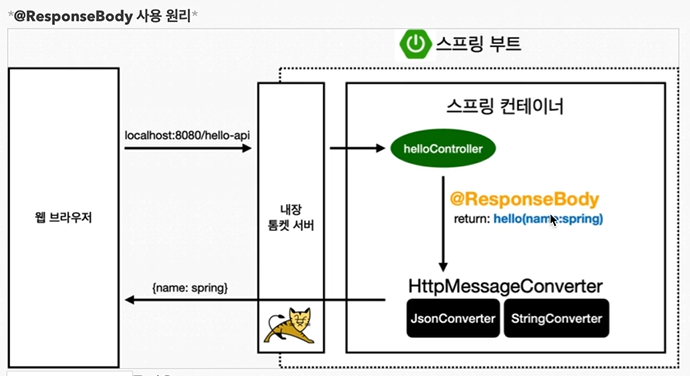
@ResponseBody 사용 원리
@GetMapping("hello-string")
@ResponseBody
public String helloString(@RequestParam("name") String name){
    return "hello " + name;
}
- HTTP의 BODY에 문자 내용을 직접 반환
- 'viewResolver' 대신에 'HttpMessageConverter'가 동작
- 기본 문자처리 : StringHttpMessageConverter
- 기본 객체처리 : MappingJackson2HttpMessageConverter
- byte 처리 등등 기타 여러 HttpMessageConverter가 기본을 등록되어 있음
728x90
'Backend > Spring' 카테고리의 다른 글
| [Spring] 스프링 입문 #4 스프링 빈과 의존관계 (0) | 2023.12.14 |
|---|---|
| [Spring] Spring Security를 이용해서 로그인 구현하기 (0) | 2023.12.11 |
| [Spring] Session을 이용해서 로그인 구현하기 (0) | 2023.11.07 |

